

Step 1 - Start from the centre front of the nappy.

Carefully unpick the seam from the centre point out each way. You should be able to see when you reach the part of the nappy that has been overlocked - stop when you reach this point on either side. You will unpick a section about 9cm long (this was in a large nappy)
Step 2 - Once you have unpicked the section of seam, turn the nappy completely inside out through the unpicked section.
 Step 4 - I have left the old elastic in the nappy and stitched the new over the top. You could unpick and remove the old elastic if you wanted. This is what the stretched leg elastic in the nappy looks like before putting the new piece in.
Hold one end of the elastic over the point that the old piece started. Using a zigzag, stitch back and forth several times to secure.
Step 5 - While stretching the elastic as much as possible, stitch along the full length with a zigzag stitch. Once you reach the other end stitch back and forth several times to secure. Trim off excess elastic.
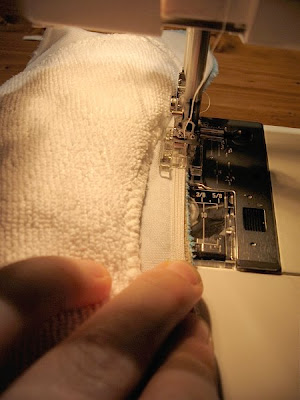 The nappy should now look like this.
Step 6 - Repeat with the other leg elastic, and back elastic.
Once they are all done turn the nappy back in the right way.

Step 7 - Stitch the opening closed. You could hand stitch it, but I just ran a line of machine stitching across. You can see it a little, but the minky hides it pretty well, and it was much quicker than doing it by hand.
All finished, and the nappy is ready to put back into your stash!
12 comments:
Well done Nic!! You must be happy to have your Ittis back in the stash!!
(Bit sad that they all went though, I haven't heard too much about elastic going in IBs, its usually in BGs!)
Do you mind if I link your tute from my parenting forum, I bet a few mums would love to have a go at repairing their nappies themselves!
P.S. Did u make a tute for your baby wrap/sling that you made for Jazzy? I'd like to try and make one for a friend, if you could tell me how its done??
Ta, Nat :)
thanks Nat - no worries about linking it - hopefully it helps someone out!
Sorry no tutorial for the sling - but it was amazingly easy...especially considering how much they cost! Here are a few of the ones I looked at before I made mine - Im sure it will be a walk in the park for you - love to saee some pics once you are done too.
http://www.mykarmababy.com/pages/BabySlingPattern.php
and there are some others on here, along with lots of other cool stuff!)
http://www.sleepingbaby.net/jan/Baby/index.html
Hey Nic, just another question about the sling - what sort did you make? I have never used a sling with any of my bubs, so its all new to me!!
You can email me if you want?
I've just done the same with all of my Bum Genius'. So nice to have a complete and functioning stash again and not have to dig around for a "good one."
Makes nappy changing a joy!
Hey nic, I’m laughing as I read your blog because jaz and millie have so many of the same clothes! In particular the pp jeans. We have good taste babe :)
And the tree sticker on jaz’s wardrobe is the one I want… I think. Having a little trouble actually committing to one. But I’m also planning a bird theme.
Love the pj’s you made! Yup you guessed it, I also have fabric sitting here waiting to be made into pj pants. You sewing projects are great.
Great tute for the the nappies… hope my elastics last, but at least I'll know where to come for fixing instructions.
Congrats on your beautiful nephew. What a darling, and your sister will be thrilled with the photos.
And of course all of your photos are beautiful! Bit thrilled to be one of your inspirations.
xxk
(Between kids that has just taken me an hour to type lol)
Pretty cool blog you've got here. Thanks for it. I like such topics and everything connected to this matter. BTW, try to add some photos :).
thanks for tutorial.. i successfully replaced the elastic in a second hand itti..
but then i attempted to do it on a SIO only to discover half way through un picking, that it wasnt going to work due to the snaps.. (couldnt turn it inside out) any advice on this??
Thanks for this - was really easy to follow.
I just did this on a snap in one and it worked well - you just need to pull the nappy between the snaps - takes a bit of manuvouring but it can be done - then to replace the elastic at the top you just pull it through across ways till you can get at it - hope it makes sense!
Hi Nic! Great tutorial! Would you mind if it was posted on the itti bitti facebook page? The elastic used in all itti bitti nappies these days is silicon but there are still some itti nappies out there that are over two years old with the old school swimwear elastic in them (quite a few in this house!)Replacing the elastic is easy when you know how:)
Thanks!
Alexis
itti bitti nappy co
Yay! Thanks for the tutorial!! Ive been building my stash with second hand itti bitti's and some need a little TLC - works out so much cheaper!! :)
Modern cloth nappies are very easy to use & care. changing a modern cloth nappies elastic can be good experience and information you shared is good.
Cloth nappies Sydney
http://www.minkiebaby.com.au/
ah this is perfect! thank you so much for putting this post together!
i'd best go buy some swimwear elastic as i've got a whole load of nappies to fix up!
Post a Comment